
 YOUR CART


In any home, curtains do more than just block light; they set the mood, add privacy, and tie the decor together. The hardware that hangs those curtains (rods, tracks, brackets, and even pelmets) is just as important as the fabric. In this comprehensive guide, we’ll walk through all the curtain-hanging essentials for Indian homes.
You’ll learn how curtain rods and tracks differ (and when to use each), what it means to have motorized curtains, how to choose the right pelmet depth and style for different room heights, and the ins and outs of bracket spacing, return-to-wall (projection), and stack-back. We’ll also answer common questions like “Which curtain rods are best in India?” and “What is stack back?” Finally, we’ll show how Eyda Homes’ made-to-measure service can deliver custom curtains with matching hardware as a full package, so everything fits perfectly.
By the end, you’ll be a curtain hardware pro, ready to pick the right rods, tracks, or motor systems for your space and install them like a designer. We’ll use easy language (no dull paragraphs!) and plenty of bullet points and diagrams to keep things clear. Let’s dive in!
Curtain Rods vs Tracks vs Motorized Systems
When hanging curtains, you generally have three choices for how the curtains attach and slide: curtain rods (poles), curtain tracks (rails), or motorized curtain systems. Each has pros and cons:
Curtain rods are the traditional option: metal or wooden poles with decorative finials on the ends. Curtains hang from rings, grommets, or clips on the rod.
Curtain tracks (also called rails) are modern: a hidden or minimal-looking channel (plastic or metal) that mounts to the wall or ceiling. Curtains have gliders/carriers that slide inside the track.
Motorized curtain systems can use either rods or tracks as the base, but incorporate an electric motor (often Somfy or similar) so curtains open/close at the push of a button or via smartphone.
Each style offers different benefits, and the best choice depends on your needs:
Appearance: Rods are decorative and can be a design feature (with wood, metal, or ornate finials). Tracks, in contrast, are sleek and mostly hidden above the curtain, great for a minimalist look. Motorized systems hide the mechanism but add electronics.
Functionality: Tracks generally offer smoother, quieter movement and can handle heavy drapes better. They can also allow curtains to stack perfectly (using traversing gliders). Rods are simpler and easier to move by hand, but very long or heavy drapes may sag or be harder to slide on a plain pole. Motorized tracks or rods shine when you want remote control or automation; Somfy, for example, touts silent battery motors that let you open/close curtains quietly from an app.
Installation: Tracks often require more precise installation (especially for a perfectly straight ceiling mount), but once in place, they give a very clean look. Rods usually need just two end brackets (and a middle bracket if wide); they’re easy to put up and adjust. Motorized systems may need wiring or batteries, but Somfy’s wireless units mean “no costly power connection” is necessary.
Curtain Type & Window Size: If you have very tall or wide windows with heavy drapes (common in Indian living room furnishings or hotels), a sturdy track (often double rail) is a smart bet. For standard windows with lighter curtains (sheers or simple cottons), a rod is perfectly fine. Tracks are also ideal for sliding panels or bay windows, since the gliders can run around curves. As one guide notes, “tracks are great for floor-to-ceiling curtains,” while rods suit standard windows.
Budget: Generally, rods are more budget-friendly. A basic extendable metal rod can cost just a few hundred rupees, whereas even a simple track system might be in the thousands. Motorized systems are significantly more expensive (see the hardware vs. cost table below for ballpark numbers).
Key Point: If you want a decorative accent or are on a tight budget, choose a curtain rod. If you need smooth operation, heavy or layered drapes, or a modern seamless look, choose a curtain track (and possibly a motor if you want automation). As the Yellow Dwelling blog advises, “If you prefer a seamless, modern style, go with tracks. If you love a decorative, statement-making design, rods are your best bet.”
Curtain Rods: Styles and Tips
Curtain rods come in many varieties and finishes, and they serve both functional and decorative roles. Here’s what to know about curtain rods in India:
Materials: Common materials include steel, iron, brass, and wood. Metal rods (steel/iron) are strong for heavier curtains, while wooden rods bring a classic warmth. The finish can be chrome, bronze, matte black, antique brass, etc., to match your decor.
Types of Rods:
Single Rods: The simplest, for one layer of curtains.
Double Rods: Allow you to hang two curtains in one window (e.g., a sheer and a blackout). Very handy for Indian minimalist homes that often layer sheer voiles with heavier drapes.
Extendable (Telescopic) Rods: Adjustable length rods (up to, say, 2–4 meters) that fit different window widths. They make DIY installation easier.
Decorative Rods: Feature fancy finials (end caps) in shapes like balls, leaves, filigree, etc. These turn the rod into a design accent.
Tension (Spring) Rods: Rods that stay up by spring pressure. No drilling needed, good for rental homes or light curtains in bathrooms/kitchens. They max out at a certain width/weight.
Choosing Materials & Styles: The finish of the rod should complement your room style. For instance, a chrome rod looks sleek in modern homes; an antique bronze or wooden rod pairs well with traditional interiors. Use black rods for bold contemporary looks or gold/antique for classic elegance.
Tips for Best Results: Install the rod about 6–12 inches above the window frame (to make the window appear taller) and extend it beyond the sides so curtains can stack clear of the glass when open. Also, put a bracket in the middle of wide spans to prevent sag (2 brackets up to ~5 ft, 3 brackets if wider).
In India, popular curtain rod brands include AmazonBasics, Story@Home, IKEA’s VIDGA, and local hardware shops. Reviewers often recommend sturdy metal rods. For example, the AmazonBasics 1″ 12 steel rod (length ~3 feet, extendable to 6 feet) is praised for handling heavy drapes up to ~10 kg. Budget stainless steel rods from Home Centre or IKEA start around ₹500–900, while elaborate double rod sets with finials may go above ₹2,000.
Curtain Tracks: Styles and Tips
Curtain tracks (also called curtain rails) hide the hardware almost entirely, offering a clean look and smooth operation. Here’s what to know:
Single vs Double Tracks: Single tracks hold one curtain; double tracks can hold two layers (similar to double rods). Double tracks are great for layering or adding sheer panels behind blackout drapes.
Materials: Tracks are usually extruded aluminum or plastic. They can be white, beige, or metallic to blend in.
Ceiling-Mount vs. Wall-Mount: Tracks can be mounted to the ceiling or the wall. Ceiling-mount tracks give a seamless, floor-to-ceiling effect (good for high ceilings). Wall-mount tracks (with brackets) are more traditional and allow decorative rods below for style.
Special Tracks: There are flexible/flexible-curved tracks for bay windows, corner tracks, and ripple-fold tracks (for structured curtain pleats). Some systems even have powder-coated colors or can be cut to size easily with a saw.
Installation: Tracks often come in kits that you cut to fit. For a neat job, have the track perfectly level (using a laser level if possible). You’ll screw brackets into studs or ceiling joists. For long spans, multiple track sections can be joined with splicers or simply aligned end-to-end (as some manufacturers describe).
Pros: Tracks let curtains glide effortlessly (especially with many gliders) and are ideal for awkward windows (bays, arches, overhead curtains). They also allow motorization more easily (mounting a motor at one end of a track is common). Tracks are excellent for hotels or offices where crisp operation is key.
Cons: They’re harder to decorate with finials (the ends are usually capped but plain). Also, because tracks mount flush, the curtains hang closer to the window (so make sure you have enough projection if you have molding, radiators, etc.).
For Indian prices: basic single tracks (1.4 m) from IKEA start at ~₹700, while a double-track wall kit is ~₹2,300. Generic plastic tracks from online sellers can be even cheaper, but often need more gliders. Remember to budget for carriers (gliders) and end-stops, which usually come with the track set. Installation costs (if you hire a fitter) may also apply.
Motorized Curtain Systems
If you want ultimate convenience, a motorized system is worth considering. This uses an electric motor to pull the curtains open or closed. Key points:
How It Works: A motor (often Somfy or a similar brand) attaches to the rod or track. When triggered by a remote, switch, timer, or app, the motor turns an internal shaft or pulley to move the curtain. Somfy offers wireless battery-powered motors (no new wiring) that last months on a charge.
Pros:
Effortless control: great for very large or heavy curtains you don’t want to tug by hand.
Silent operation: Somfy emphasizes “absolute silence,” so it doesn’t bother you.
Smart home integration: you can schedule curtains to open at sunrise or integrate with voice assistants (Somfy works with many platforms).
Energy savings: Automatically closing blackout curtains at sunrise can cut AC usage.
Cons:
Cost: Motorized systems are much pricier. A single Somfy motor unit can cost ₹10,000+ (and you may need one per curtain panel).
Complexity: Requires correct installation. Though Somfy systems are “easy to install” (just clip on, no hardwiring), you should follow instructions closely. Batteries or access to charging points are needed.
Options in India: Many home automation stores sell Somfy motors and tracks (e.g., Buildwell, TradeIndia listings). Some retailers even quote track prices per foot (e.g., ₹250–1200/ft depending on type). Fully motorized curtain setups can start around ₹15,000–20,000 for a medium window (motor + track) and go up from there.
Use Cases: Motorized curtains shine in high or hard-to-reach windows (imagine 15 ft dining room curtains or skylights). They’re also great in tech-savvy luxury homes. For most average home needs, manual tracks/rods suffice, but if you value that “automated lifestyle” vibe, they’re a fantastic upgrade. Somfy even highlights that motorized curtains “create a comfortable and elegant living environment” where you can control curtains via smartphone.
In summary, your choice among rods, tracks, or motorized systems should be driven by your room’s requirements. Heavy drapes on large windows? Lean toward a sturdy double-track, perhaps with motorization. A small standard window with light voile? A simple decorative rod will do. And if you ever feel lost, companies like Eyda Homes offer expert advice and even measurement services, ensuring you end up with the perfect setup.
Types of Curtain Hardware: Rods, Tracks & Brackets
Let’s break down the common hardware pieces by type, with their functionality and approximate price ranges in India:
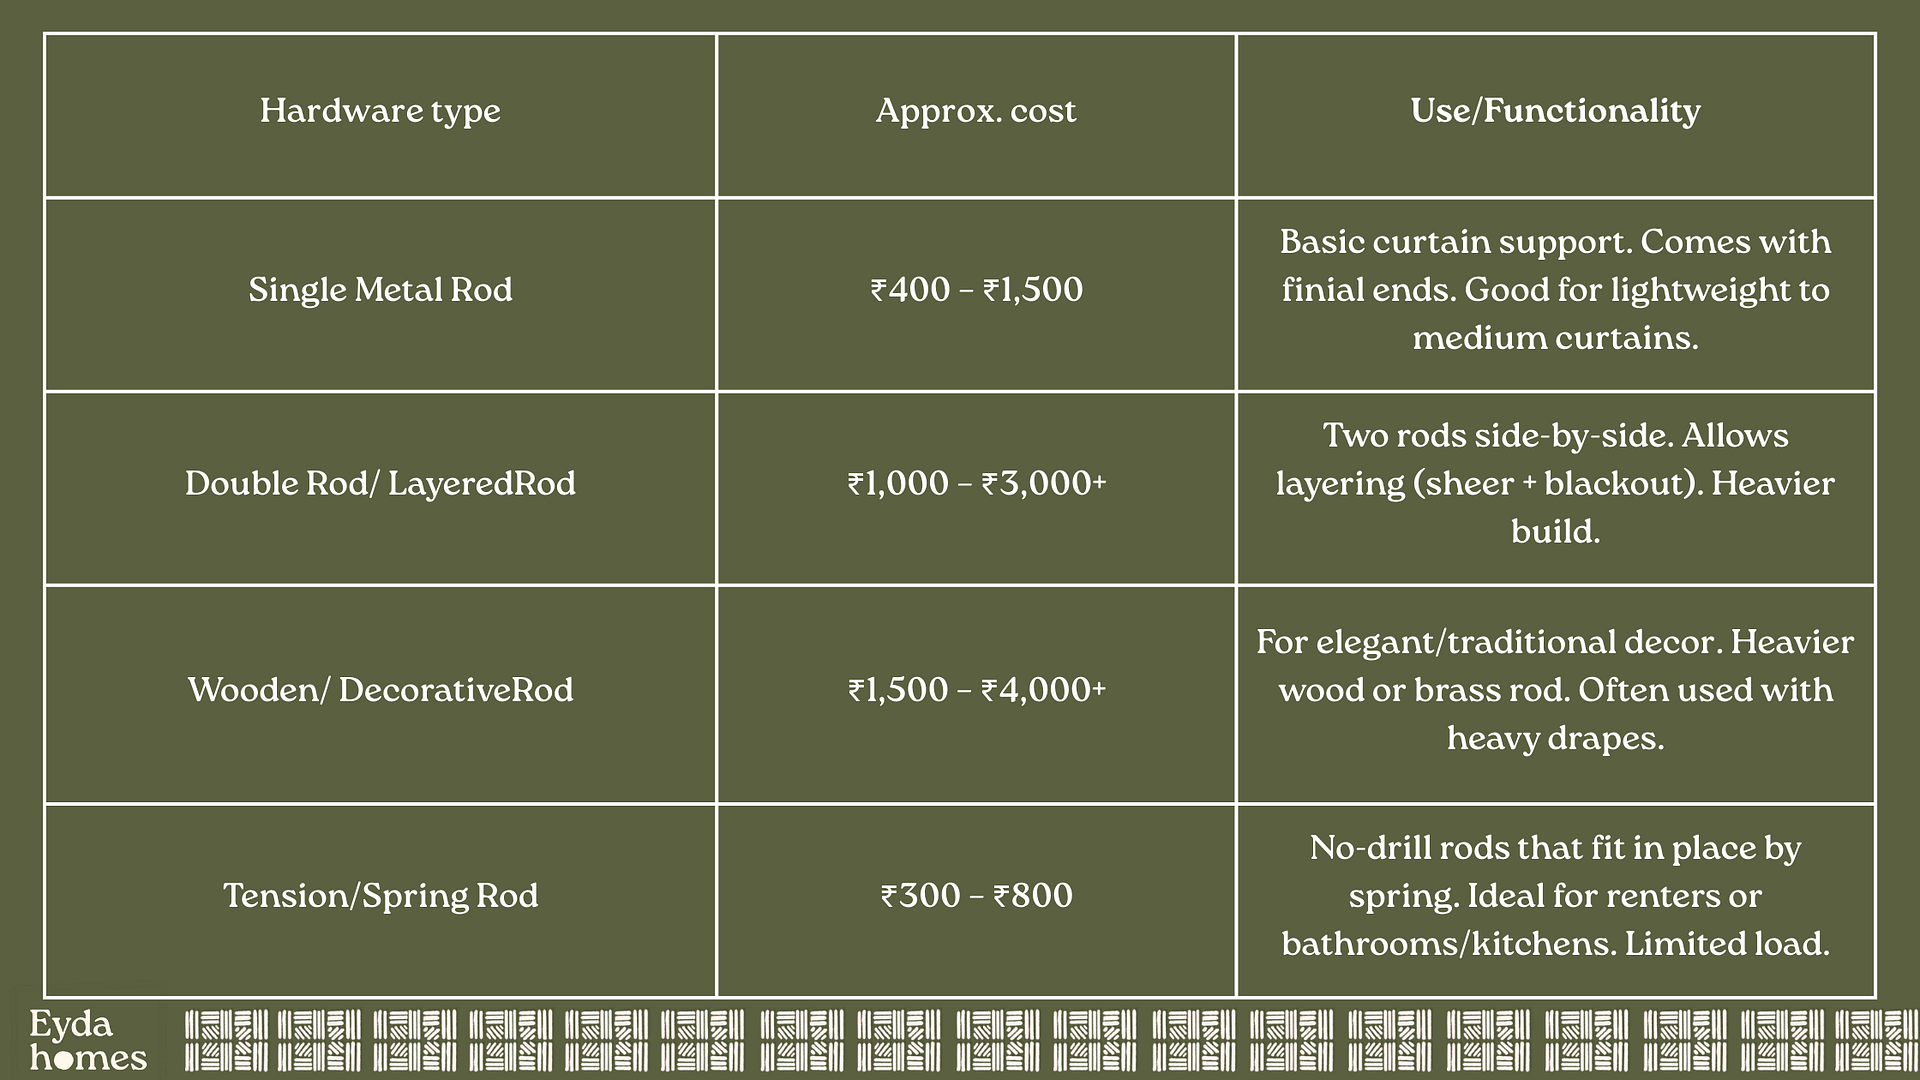
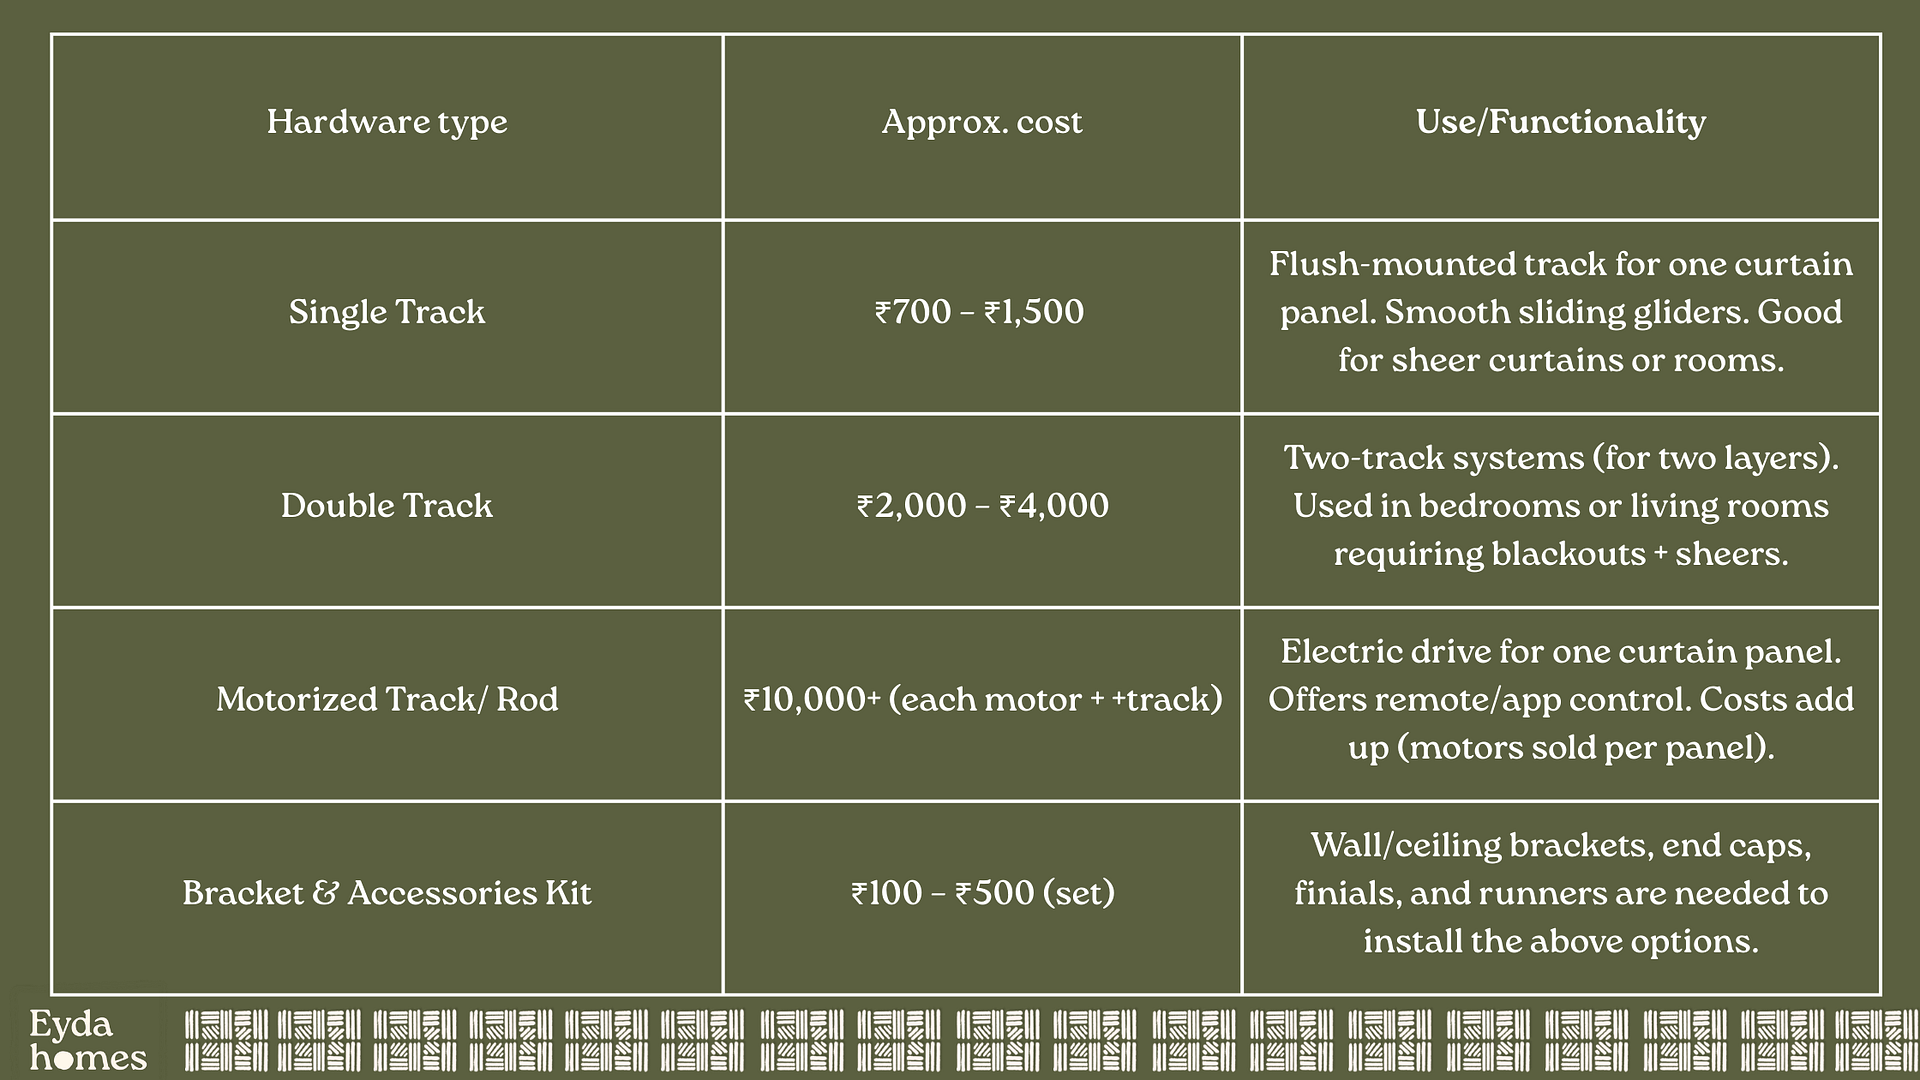
Table: Compare common curtain hardware. Prices are approximate and will vary by brand and retailer. These ranges give you a ballpark: simple rods and basic tracks are very affordable, while heavy-duty or automated hardware costs more. For example, IKEA India lists a 1.4 m single-track (with fittings) at ~₹700, whereas a two-track wall-mount set is ~₹2,300. Likewise, extendable steel rods can be found for ₹500–700, whereas ornate wooden rods with finials often cost more than ₹2,000.
Functionality Notes:
Rods: Best for ornamental appeal and lighter curtains. Extendable ones let you fit odd sizes. But very heavy drapes on a thin rod may bow or make opening tough.
Double Rods/Tracks: Essential if you want a sheer layer and a blackout layer. The inner track/rod holds the voile, and the outer holds the blackout.
Brackets and Returns: Always use the right number of brackets (see below). Choose brackets with the correct return (how far the rod/track protrudes from the wall) so the curtains hang clear of the window frames. Typical returns are 3–6 inches, enough to clear handles or moldings.
Motorization: Classified as motorized tracks/rods. Very convenient, but not something you rush into. Ensure proper professional installation for safety.
Now that you have an idea of the hardware options, the next question is installation: How far apart to space brackets, how to ensure the curtains stack neatly, and what measurements matter. We’ll cover that next.
Installation Tips: Bracket Spacing, Projection, and Stack-Back
Getting your curtain hardware installed correctly is crucial for a polished look. Here are the key concepts:
Bracket Spacing: Curtain rod brackets should support the weight of the curtains evenly. A general rule: for a 1–1.5″ diameter metal rod, use two end brackets up to about 60 inches (5 feet) span. If your rod span is over 5 feet, add a third central bracket to prevent sagging. For heavier 2–3″ poles, you can stretch up to ~8 feet with two brackets (one at each end), but if it’s longer, definitely use a middle support.
In short:
- 0 to 5 feet: 2 brackets (one on each end).
- 5 to 8 feet: 3 brackets (two ends + one center).
- Over 8 feet: consider multiple brackets/joins or a sturdier system.
For curtain tracks, the spacing is usually fixed by the track profile, but typically you’ll still anchor the track at least every 4–5 feet. Always follow the manufacturer’s guide for your specific track type (some come with prescribed hole spacing).
Projection / Return: These terms describe how far the curtain hangs out from the wall.Return (to wall) is the distance from the wall to where the curtain sits on the rod/track. In practice, it means the curtain is a few inches away from the wall enough to clear any window frame or obstruction. Continental Window Fashions explains that “return is the point where your drapery will hang… measured from the center of the curtain bracket cup to the wall.” So if you want curtains to cover a deep window frame or open doors fully, you might choose a larger return bracket.
Clearance is the gap between the back of the curtain (or rod) and the wall. It’s essentially the same idea: if you have thick blinds or radiators under the window, you might want at least 4 to 6 inches of clearance. Otherwise, the curtains might rub on something.
Bottom line: make sure your brackets allow the curtain to fully stack off the wall when open.
Curtain Stack-Back: When curtains are open, the fabric stacks back at each side of the window. This matters because thick curtains can eat into your window width when pulled back. The stack-back percentage is the percentage of the curtain’s full width that remains visible in folds when fully open. For example, a 20% stack-back means 20% of the total curtain width is bunched on each side.
Different curtain styles have different typical stack-backs:
- Grommet/eyelet curtains: ~8–15% stack-back.
- Rod-pocket curtains: ~12–20%.
- Pinch pleat or tab-top curtains: ~20–25%.
- Ripple-fold or flat panel: can be 15–30%.
Curtarra’s guide gives an example table: grommet curtains only need about 8–12% stack-back, while pinch-pleat curtains need 20–25%. In other words, if you have 100 inches of fabric panel, only ~10–25 inches will actually cover each window side when open (because the rest is gathered). Plan for this when measuring your rod width: you may need extra rod length so that the curtains don’t cover too much glass when open.
Stack-Back Depth: This is how far the fabric sits out from the wall when open. Typically, you want the fabric flush with the rod or pelmet box, so leave enough depth. A common rule is to have the rod/pelmet extend about 4–6 inches from the wall. The fabric then sits just beyond that point when stacked.
Practical tips
Always overhang the rod by ~6–12 inches beyond each side of the window frame. This extra width ensures light gaps are minimized and allows the curtains to fully clear the window.
Use a level when installing brackets so the rod is perfectly straight. An uneven rod makes the curtains look crooked and slide improperly.
Screw brackets into wall studs or ceiling joists if possible for strength. If drilling into drywall alone, use proper anchors (the bracket description from DesignerDraperyHardware warns that plastic anchors are unreliable for heavy curtains).
After mounting brackets, test the brackets by laying the rod or track on them and hanging the curtains before final tightening. This way, you can adjust spacing and height.
By paying attention to bracket number/spacing and return distance, your curtains will hang beautifully and function smoothly. Next, let’s tackle curtain pelmets, an accessory that’s coming back into vogue.
Curtain Pelmets: Styles, Measurements, and Installation
A pelmet (also called a cornice) is a wooden or fabric-covered box that sits above the window, hiding the curtain track/rod and adding a decorative border. In India, pelmets and valances (the fabric-only version) add a finished, luxurious feel to traditional decor. Here’s what to know:
What is a pelmet?
Essentially, a pelmet is like a shallow shelf or “box” attached above the window frame, often flush with the ceiling or wall. It conceals the curtain hardware (no one sees those gliders or rod ends behind the fabric). Pelmets can be soft (just a padded fabric valance) or solid (a rigid wood box covered in fabric). Fabrics & Papers notes that pelmets were historically used to hide tracks and also help insulate windows. Designer Cameron Kimber (House & Garden) points out that he uses pelmets to “add height to windows and soften a room… [they] hint at luxury and give a finished feel.”
Styles of Pelmets:
Soft (Fabric) Pelmets/Valances
Simply a fabric swag or short gathered valance that hangs below a wooden board (sometimes called a corona). Gives a romantic, traditional look.
Box Pelmets
Rigid boxes covered in fabric (or wood). These can be flat or have decorative edges. According to Fabrics&Papers, “box pelmets embrace a wide range of fabrics… they provide a tailored, neat finish to the room.” Box pelmets are common in country-style and modern homes alike; their depth (front-to-back size) can be adjusted to suit the room.
Shaped Pelmets
More elaborate sculpted designs, scallops, arches, steps, etc. These are bespoke and can echo other room details (like mimicking a headboard shape).
Pelmet Depth Guidelines: How deep should a pelmet be? It depends on the window and style.
But a practical guide is 4 to 6 inches in depth (return) at a minimum. Fabric Direct’s measuring guide recommends at least 10 cm (4″) deep, ideally 15 cm (6″), to allow curtains to stack behind without pressing into the pelmet. Remember Cameron Kimber’s advice: “The depth of the pelmet is so important. Too shallow, and it can look very mean; too deep, and it will look over the top and out of proportion.” So in a modest-height room, a shallow pelmet (4–6″) is usually enough. In a very tall-ceilinged room, you could go deeper or raise the pelmet height to fill spaceFabrics&Papers even suggests placing a pelmet above the frame to make ceilings look higher.
Styling for Room Height:
Low Ceilings (8–9 ft): Many designers recommend skipping an elaborate pelmet on low ceilings, since it can encroach on the vertical space. If you do use one, keep it very simple and shallow, or align it flush with the ceiling to avoid chopping down the height.
Average Ceilings (9–10 ft): A modest box pelmet (~6″ deep) can look elegant here. It adds a finishing detail without dominating. Match its fabric to the curtains or make it a slightly contrasting color.
High Ceilings (11+ ft): You have freedom to go deeper with the pelmet (8–12″ or more), or even shape it decoratively. You can also mount it a bit above the window top to draw the eye up. As Fabrics&Papers notes, a well-placed pelmet can “trick the eye” and enhance perceived height.
Measuring a Pelmet:
Width (span): The pelmet should cover the entire rod plus a little extra. Fabric Direct recommends extending the pelmet at least 15 cm (6″) beyond each end of the curtain track (same as for rods). So if your rod is 200 cm wide, make the pelmet ~212 cm wide. This ensures the curtains can disappear behind it fully.
Depth (return): As above, start at 4″ (10 cm) and adjust if needed. For very heavy or layered curtains, 6″–8″ is safer so the fabric doesn’t cramp.
Height (drop): Usually, the pelmet’s front face lines up with the top of the window frame or ceiling line. You’ll cover the headrail/cornice area completely. The exact height will be calculated by your provider in “proportion to the length of your curtains.”
Installation Steps: Installing a pelmet is a bit like installing a shallow box above the window. In general:
Prepare: Remove existing curtains and clear the area below. It’s best if the room is empty (Pelmet fitting can be messy with drilling).
Mount the Board: Using a level, mark where the pelmet board (or cornice) will go. Drill and fix support brackets or angle braces into the wall/ceiling. (If it’s a rigid wooden board, secure it with screws through brackets at regular intervals.) Ensure the pelmet extends evenly beyond each side (e.g., +6″).
Finish: Once fixed, seal or paint any screw holes or edges (as needed). Many fabric pelmets also have a strip of Velcro or tape to attach the decorative fabric cover, or you can staple the fabric neatly to the frame.
Rehang Curtains: Slide the curtain onto the rod or track (or hook onto the pelmet board’s concealed rail) and close the curtains. The pelmet should now neatly cover the hardware.
Tip: If hiring a professional, they will often treat and paint the installed pelmet (“like an L-box”) to match the room. If DIY-ing, protect the area well (drop cloths!) and finish all surfaces after installation, embedded with pelmets, your window treatments will look custom-made.
Eyda Homes, for instance, can supply made-to-measure pelmets along with curtains so everything coordinates perfectly. (They emphasize that each piece is “crafted with care” and how the fabric falls in your space, illustrating their bespoke service.) In other words, by ordering a full curtain + pelmet package, you avoid sizing mistakes and get a polished final look.
Curtain Hardware for Different Rooms in India
Every room has its own needs. Here are some quick guidelines tailored to common Indian home scenarios:
Living Room/Family Room: Often has large windows or French doors. You might use:
Hardware: Heavy-duty double tracks or thick rods (2–3″) to handle layered curtains (sheer + blackout). Consider motorization if the curtains are very wide.
Pelmets: Box pelmets work well here if you want a formal look. A depth of ~6″ is a safe start. If ceilings are high, you can go deeper or add decorative shaping.
Tip: Stack-back can be significant with wide panels. Allow extra rod length beyond the window so the curtains don’t crowd the glass when open.
Bedroom: Privacy and blackout are key. Typically:
Hardware: Double rods or a dual-track system so you can have a sheer inner curtain and a blackout outer. Decorative wooden or metal rods (with finials) are popular for a cozier feel.
Motorization: Useful if you want to automatically close curtains at sunset or with an alarm.
Pelmets: Many Indian bedroom decor (especially traditional) includes a pelmet for a “finished” look. Soft pelmets with fringe can feel romantic; box pelmets look more tailored. Depth around 5–6″ is common here. If your bedroom ceiling is low, keep the pelmet shallow or choose a simple rod instead.
Kitchen/Bathroom: These often have small windows.
Hardware: Simple tension rods or light-duty aluminum rods are easiest (no heavy curtains needed here). Thin sheer or cafe curtains hang nicely.
Pelmets: Rarely used in modern dining & kitchen, and bath supplies. A light fabric valance could add charm if you like vintage style.
Formal Dining/Study: If you have elegant decor:
Hardware: Polished wood or metal rods with ornate finials can serve as design elements. Patterned or damask curtains here look great with matching pelmets or valances.
Tip: In classic-style rooms, fabric-covered box pelmets with trims (fringe or braid) are a design option to echo furniture details.
Always coordinate color and material with your room’s palette. In India, bright prints and rich colors are common. Make sure your rod/track finish (brass, black, or wood) complements the fabric. When in doubt, pick a neutral hardware finish (black or brass) that goes with most decors.
Frequently Asked Questions
Which curtain rods are best in India?
There’s no one-size-fits-all “best rod,” but Indian reviewers tend to favor sturdy metal rods with the right finish. Key points:
Strength: A top pick is AmazonBasics’ 1″ metal rod, which reviewers note is “designed using strong metal” and can handle curtains up to ~10 kg. If you have heavy drapes, look for rods of 1″ diameter or more, made of stainless steel or iron.
Adjustability: Extendable rods are popular because they fit many widths. The CashKaro list highlights various extendable rods (Ikea RACKA, Wolpin, etc.). Choose one where the extended length covers your window plus a cushion.
Ease of Installation: Tension rods (like the Story@Home brand) are praised for their no-drill setup. For
For example, a PVC tension rod can extend 40–71″ and “bear up to 5 kg” while being “easy to customize in length.” These are great for bedroom sheers or rental spaces.
Style & Price: IKEA’s simple steel rods start around ₹650–900 (3–4 feet). Online brands like FapBadri, FlyRailRun, etc. also offer budget rods under ₹1,000. Fancy rods with carved wood or crystal finials from home decor stores can cost ₹2,000–3,000 or more. Decide how much your decor effort is worth.
In summary, choose a rod that is thick and well-supported for your curtain’s weight. For lightweight curtains or quick fixes, even a ₹300 tension rod can do the job. For heavy, luxurious drapes, spend more on a 1″+ diameter rod kit with solid brackets.
What is stack-back in curtains?
“Stack-back” refers to the space that curtain fabric occupies at the sides of a window when the curtains are fully open. In other words, it’s how much of the fabric is stacked back (bunched) behind the ends of the rod or track. A few points:
Stack-back is usually expressed as a percentage of the curtain’s full width. For example, if you have a pair of curtains, each 100″ wide, and they each take up 15″ when open, that’s a 15% stack back.
It depends on the curtain style and fullness. Lightweight or sheer curtains stack back less (often 8–15% of their width), while pleated or tab-top curtains can stack back more (20–30%). The thicker the fabric and the heavier the pleat, the bigger the stack-back.
Why it matters: If your curtains have a large stack-back, they will block more of the window even when “open.” So you should offset your curtain rod accordingly. For example, if each panel stacks to 20% of its width, you might set the rod ends farther from the window to avoid the fabric covering the glass.
Practical tip: Curtain specialists recommend counting about 10–20% of fabric width per side as stack-back for most curtains. You can also use online calculators (Curtarra has one) or simply measure a swatch: pull the curtain all the way aside and see the width it occupies.
In short, stack-back is the hidden width of your curtain bunch when open. Plan for about 1–2 feet of extra rod length per window (or roughly 10–20% of total fabric) to ensure your curtains stack neatly off the pane. This way, you keep the full view when the curtains are drawn aside.
How to install curtain pelmets?
Installing a pelmet (cornice) involves some carpentry, but here’s a step-by-step overview:
- Clear the Area: Remove your curtains and any furniture from around the window. Work is easier (and cleaner) in a space. Lay drop cloths on the floor for sawdust and paint drips.
- Measure & Mark: Decide how high to mount the pelmet above the window (often flush with the ceiling or top of frame). Using a level, mark the pelmet’s outline on the wall/ceiling, extending it about 6″ (15 cm) beyond each curtain end. This extra width allows the curtains to tuck behind the sides.
- Fit Support: Drill holes and secure wall or ceiling brackets where you marked. Some people build an “L-shaped” wooden frame. Merrick & Day (a UK drapery supplier) advises marking the bracket holes with a pencil, drilling, plugging, and screwing the bracket into position. The pelmet board will rest on or attach to these brackets.
- Attach the Pelmet Board: If your pelmet is a rigid board (like an MDF box), lift it onto the brackets and secure it with screws. If it’s an upholstered foam pelmet, it may have a cleat or Velcro strip to attach. Make sure it’s level and flush at the front.
- Finish: Seal and paint any exposed edges. The RCS Singapore guide notes that after installation, you should paint the pelmet, sealing the edges and protecting it from dust. If it’s fabric-covered, smooth out the fabric and staple it at the back/inside so the front looks seamless.
- Rehang Curtains: Finally, hang your curtain rod or track under the pelmet (or into it if it contains a hidden rail) and put the curtains back up. The pelmet should now conceal all the hardware.
A key hint: the pelmet should cover the entire headrail/cornice snugly. Eyda Homes’ made-to-measure service can take care of these measurements so you don’t have to guess (they design each pelmet depth and width to match your curtains and windows perfectly). In any case, after installation, double-check that the curtains can fully retract under the pelmet without rubbing or bunching.
Visual Guide: Installation and Stack-Back
Figure: Curtain stack-back diagram. This illustrates how much fabric (gray) is “stacked” at each side when the curtains are fully opened. You’ll need to allow for this space when measuring the rod width.
Figure: Ceiling-mounted curtain track installation. The diagram shows a track fixed to the ceiling with screws and brackets, allowing curtains to glide along it. (The above diagrams illustrate common installations: the first shows stack-back width; the second shows a typical ceiling-mounted track.)
Made-to-Measure Services (Eyda Homes)
Finally, if the whole measuring-installation process sounds daunting, know that brands like Eyda Homes offer turnkey solutions. Eyda specializes in made-to-measure curtains (with pelmets and hardware if needed), delivered to your door. According to their website, “each piece is crafted with care… imagined with your home in mind.” They can provide both the fabric panels and the matching rods/tracks as a single package. This ensures a perfect fit into ugly gaps or overlapping and saves you the headache of figuring out stack-backs and returns yourself. Eyda’s philosophy of caring about “how fabric falls” implies they pay attention to these details. So if you want personalized, artisan-quality curtains with hardware included, consider such services to make your life easier.
Summary
In summary, the best curtain hardware depends on your needs:
– Use rods for a classic decorative look or lighter curtains.
– Use tracks for a sleek, modern look, heavy drapes, or special window shapes.
– Add motorization for hands-free control (especially for large/fixed windows).
– Plan the pelmet size based on room height: about 4–6″ deep is typical, but skip deep pelmets on low ceilings.
– Space your brackets about every 5 feet for standard rods, and set the return so the curtains clear any molding or furniture.
– Account for stack-back (the fabric at the sides), typically 8–25% of curtain width, so extend the rod well past the window edges.
By following these guidelines and comparing options, you’ll ensure your curtains not only look beautiful but also function smoothly. And remember, services like Eyda Homes can handle custom sizing for you, bundling the right rod/track with your chosen textiles.
Helpful Resources: For further reading, check out guides like Curtain Tracks vs. Rods on VistaFashions or TheYellowDwelling’s curtain hardware guide. They reinforce many of the points above (e.g., tracks for heavy curtains, rods for style). Armed with this knowledge, you’re ready to choose the perfect hardware for your Indian home! Contact Eyda Homes for more details.
Note: Eydahomes is a home decor brand offering linen curtains and thoughtfully crafted decor goods. This blog is purely for informational purposes. We do not sell curtain hardware or related accessories.